Defguard 1.6 introduces an important change for macOS users: the Desktop Client now integrates with the macOS system and removes the dependency on external WireGuard binaries, which makes App Store distribution possible. For a complete overview of all new features in Defguard 1.6, see our release notes.
Because of Apple’s restrictive rules for App Store apps (each app is isolated and access to its data is restricted by non‑App‑Store apps), migrating from Defguard 1.5 (PKG) to 1.6 (App Store) is not a “regular upgrade” and requires moving your 1.5 client settings or re‑enrolling in the new version.
What changed in 1.6 vs 1.5?
App Store distribution
With Defguard 1.6, the macOS Desktop Client is distributed through the Mac App Store instead of a standalone PKG installer. This enables automatic updates for users, ensures the application is reviewed and approved by Apple, and changes how the app is installed and managed on macOS in line with Apple’s recommended distribution model.
Integration with macOS networking
The 1.6 macOS client uses a native Swift wrapper around CloudFlare’s boringtun instead of relying on external WireGuard binaries. This allowed for an improved macOS integration like:
- Maintaining VPN connections while switching from one network to another (e.g., changing Wi-Fi networks).
- Integration with System Settings (Defguard VPN connections are now listed in system settings).
- Integration with Control Center.
Why is a migration required instead of a regular upgrade?
A standard upgrade assumes that a new version can install “over” the old version and automatically reuse the same settings and local configuration directory. That does not apply here because:
- The installation method changes (from PKG to App Store), and macOS treats App Store apps differently.
- App Store sandboxing changes where data lives, so the new client will not automatically find the old settings directory.
Note: In practice, if you install Defguard Client v1.6 from the App Store, the app will start fresh (as if it’s newly installed), and existing local configuration from 1.5 won’t be picked up automatically.
Migration methods
Below are the supported migration approaches. Choose the one that best fits your setup.
Method A - Dedicated macOS migration tool
This option uses a simple migration tool with a graphical user interface that automatically migrates an existing Defguard 1.5 client configuration to the Defguard 1.6 App Store location.
The migration tool:
- Detects if Defguard Client 1.6 was installed.
- Detects an existing Defguard Client 1.5 configuration.
- Copies the 1.5 Client settings to the correct Defguard Client 1.6 App Store location.
Step-by-step instructions:
- Install Defguard Desktop Client 1.6 from the Mac App Store.
- Download the Defguard Migrator app from the release assets.
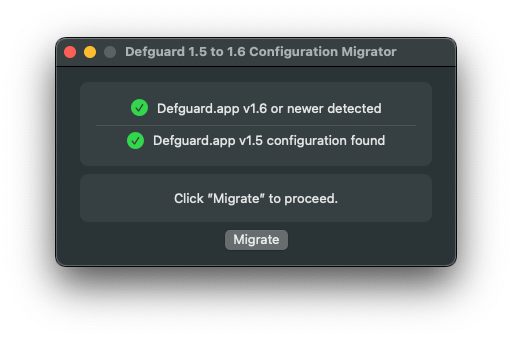
- Run the migrator. It should detect the existing 1.5 configuration and a freshly installed 1.6.
- Click Migrate. If everything went well it should display a confirmation message: “Configuration has been migrated”.
- After the migration process, launch Defguard 1.6 from the Mac App Store. Your existing configuration should be available.
🎥 You can see this method in action on a video guide below:
Method B - Manual migration (copy/move the settings folder)
This method preserves local client settings by manually moving them from the 1.5 location into the 1.6 App Store container path.
Option 1: Step-by-step instructions using Finder
- Install Defguard Desktop Client 1.6 from the Mac App Store.
- Make sure Defguard 1.6 is not running.
- Open Finder.
- From the menu bar, select Go.
- Hold Option (⌥) and click Library.
- Copy or move the contents from:
Application Support/net.defguardto:Containers/net.defguard/Data/Library/Application Support/net.defguard - After moving the configuration, launch Defguard 1.6 from the Mac App Store. Your existing configuration should be available.
Option 2: Step-by-step instructions using Terminal
- Install Defguard Desktop Client 1.6 from the Mac App Store.
- Make sure Defguard 1.6 is not running.
- Open Terminal.app.
- Execute the following commands:
# Remove any existing Defguard 1.6 configuration directory (if present)
rm -r ~/Library/Containers/net.defguard/Data/Library/Application\ Support/net.defguard

# Move Defguard 1.5 configuration to the new App Store container location
mv ~/Library/Application\ Support/net.defguard \
   ~/Library/Containers/net.defguard/Data/Library/Application\ Support/net.defguard
After running these commands, launch Defguard 1.6 from the Mac App Store. Your existing configuration should be available.
Method C - Re-enrollment in Defguard Client 1.6
This method is recommended when you want users to start with a clean Defguard 1.6 setup without migrating local settings from version 1.5.
Step-by-step instructions
- Connect to the VPN using Defguard 1.5 (PKG version). This ensures the device is already authenticated and has access to the Defguard instance.
- Go to your user profile in Defguard.
- Click Add device.
- Select Remote device activation.
- Copy the URL and Authentication Token.
- Install Defguard Desktop Client 1.6 from the Mac App Store.
- Open the Defguard Desktop Client 1.6.
- Click the Add instance.
- Paste the URL and the Authentication Token.
- Name your device.
- Confirm the configuration. The instance will appear in the client.
- Select the instance and connect to the desired VPN location.
🎥 You can see this method in action on a video guide below:
Official documentation: Desktop client instance configuration guide
Making sure the migration worked
Launch Defguard 1.6 and verify:
- your VPN instances and locations are present
- the VPN connection works as expected